How to Access Webcam on Laptop Windows 7
Z7_3054ICK0KGTE30AQO5O3KA30N0
hp-concentra-wrapper-portlet
![]() Actions
Actions
HP Notebook, Touch, and AiO PCs - Webcam Troubleshooting (Windows 7)
This document is for HP computers with built-in webcams and Windows 7.
Some HP notebooks, Touch, and AiO computers come with preinstalled webcams that can be used to capture video motion or still images. A webcam is a video input device, similar to a scanner or camera, and does not work unless you have software that works with your webcam hardware. The two most common types of software that use webcams are Internet messaging software (for making video calls over the Internet), and video editing software (for creating and sharing video files).
Use one of the following sections that best describes your situation.
Can't find the webcam or webcam software
Are you not sure how to get the images from the webcam into Windows? Are you not sure if your computer has a webcam?
Step 1: Looking for webcam hardware
Take a quick moment to visually inspect the top of your computer's display. Look closely, you should see a small lens in the top center if your computer has a webcam. Some models do not come with a webcam and the area where the webcam would normally reside is replaced by a small plastic plug. Often, there are small holes near the top center of your display. These holes are for the microphone or other sensors and do not contain a webcam.
-
If your computer does not have a built-in webcam, you must use an external USB webcam.
-
If your computer has a built-in webcam and you cannot use it, continue to step 2.

Step 2: Finding and using the Webcam software that came with your computer (Windows 7)
If your computer came with a built-in webcam, HP has pre-installed software that you can use to record and share webcam video. Find the software products on your computer as follows:
-
Click Start, type Device Manager in the search field, and then select Device Manager from the search results list.
-
Double-click Imaging devices.
-
Click the name of the webcam software from the search results list. If the name of your webcam software does not appear in the search results list, try searching again using one of the other names.
-
If you cannot find and open the webcam software for your computer, then continue to the next step.
-
If you found webcam software, it opens, and you can see an image, then you are finished. Your webcam is working.
-
If you found webcam software, it opens, but you cannot see video in the main display window, restart the computer and try again. If the problem persists, use the troubleshooting section Video does not appear in webcam software.
-
Video does not appear in your webcam software (such as YouCam, Skype, Messenger, etc.)
You can open webcam software, such as YouCam, Skype, or Live Messenger, but video does not appear in the main viewing window. Use the following steps, in the order they are presented, until webcam video appears in your webcam software or it has been determined that the computer requires service:
Step 1: Making sure the webcam is the selected video/capture device
Your webcam must be selected as the video capture device in your webcam software. If the computer has multiple video input sources, your webcam software might be connected to something other than your webcam.
To select the webcam as your video source, open your webcam software and look for video camera, video source, or video caption in the software's properties or preferences. Here are some common examples of selecting the webcam as the video source:
note:The name of your webcam displays as USB Video Device, HP Webcam, USB 2.0 Camera, HP Pavilion Webcam, or something similar. If you do not know the name, select a name to see if video displays. If not, try selecting other video device names until you see the video from your webcam display in the window.
Using your webcam with Cyberlink YouCam
Follow these steps to use your webcam with Cyberlink YouCam:
-
In YouCam, click the Configure icon
 .
. -
Select the name of your webcam from the Capture Device drop-down list.

-
Select OK to accept the selection. Exit and restart the YouCam application to view an image.
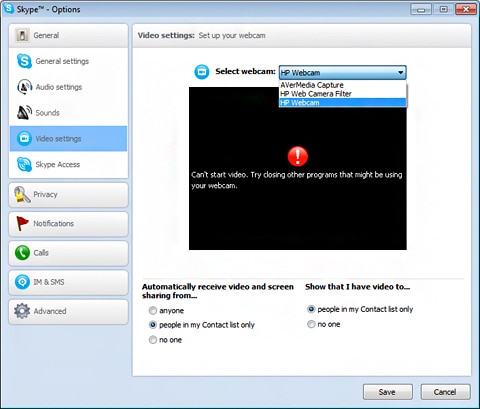
Using your webcam with Skype
Follow these steps to use your webcam with Skype:
note:These steps are for Skype version 5. The version on your computer might be different.
-
In Skype, click Tools, and then click Options.
-
Click Video Settings from the left side of the page.
-
Select the name of your webcam from the Select webcam list.
-
When the video displays in the pane, click Save.
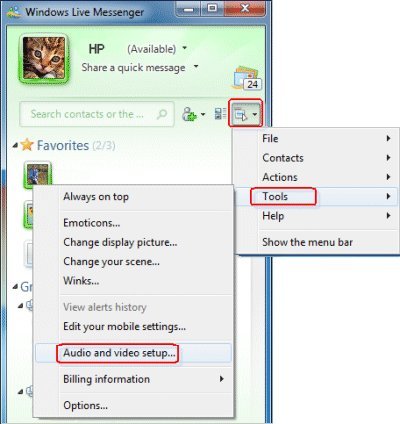
Using your webcam with Windows Live Messenger
Follow these steps to use your webcam with Windows Live Messenger:
-
In Live Messenger, click the arrow icon on the Windows Live Messenger toolbar.
-
Click Tools, and then click Audio and Video Setup.
-
Click Next.
-
Select the name of your webcam from the drop-down list.

-
Click Finish.
Video should display after selecting the webcam as a source. If not, continue to the next step.
Step 2: Restarting the computer to correct webcam problems
The webcam may be associated with another software program or not responding. Often, restarting the computer can correct the problem. Restart the computer and open your Webcam software as soon as Windows finishes loading.
If restarting the computer does not correct this problem, continue troubleshooting.
Step 3: Updating or changing the webcam driver in Windows 7
Some software applications require updated drivers for your webcam to display video or they might need a more basic driver. Use the following steps to change the driver for your webcam:
-
If a Let's identify your product to get started page displays, click Laptop or Desktop.
The product support page opens.
-
Type the model name for your computer in the Or, enter your serial number field, and then click Submit. For example, type Pavilion HPE h8-1360t Desktop, and then click Submit.

-
If a Matching products webpage opens, select your model number from the list.
-
The software results page for your computer displays with the default operating system selected. If you need to change the operating system, click Change, select your version, and then click Change.
note:
If you cannot find the operating system you want in the list, HP does not have drivers for that operating system.

-
From the list of available software and driver categories, find the webcam driver.
-
If a webcam driver update is available from HP, download the file to your computer and install the software according to the instructions on the webpage. After updating, restart the computer, and then try using your software again. If the problem persists, continue using these steps to install a generic Windows USB video driver.
-
If a webcam driver is not available from HP or you cannot access the Internet, continue using these steps to install a generic Windows USB Video driver.
-
-
Click Start, type Device Manager in the search field, and select Device Manager from the search results list.
-
Double-click Imaging Devices to expand the list of webcam drivers.

-
If there is no imaging devices category listed in Device Manager, stop using these steps and see the section Webcam is not listed in Device Manager in this document.
-
If more than one webcam driver is listed, right-click the driver and select uninstall for any driver that is not the HP Webcam-101 or Microsoft USB Video Device driver. Once the other drivers have been removed, restart your computer and open your software. If problems persist, continue using these steps.
-
-
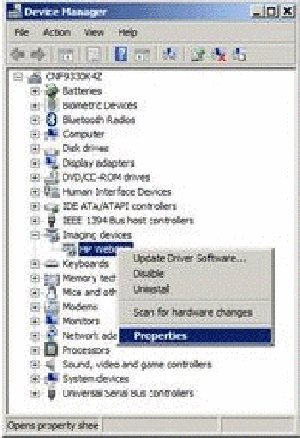
Right-click the name of the webcam in the Images Devices category (HP Webcam-101 or Microsoft USB Video Device), and select Update Driver Software.
-
Click Browse the computer to select a specific USB Video Device driver.
-
Double-click Imaging Devices to expand the list of webcam drivers, right-click the webcam driver, and then select Properties.
-
Make a note of the existing name of the webcam driver (Example: HP Webcam), as it might change after the update.
-
On the Webcam Properties window, select Update Driver....
-
When prompted, select the option to Browse the computer for desired driver.
-
When prompted, select the Let me pick from a list of device drivers on my computer option.
-
Remove the selection from Show compatible hardware, select Microsoft in the Manufacturer pane, and select USB Video Device in the Model pane.
-
Click Next to install the webcam driver.
-
Allow the installation of the USB Video Device, and then click Close.
-
After the device has been updated to USB Video Device in Device Manager, restart your computer and open the software. If problems persist, install the latest BIOS update from HP and get all the latest Windows 7 Updates from Microsoft.
Webcam is not listed in Device Manager (Windows 7)
The drivers for the Imaging devices, which include the webcam, are not displayed in the Device Manager. To resolve this problem, use the following steps:
Video overview

-
Shut down your computer, and disconnect the power cord.
-
Remove the battery from the battery compartment. If your computer has a sealed battery that cannot be removed, then perform a reset. Go to HP Notebook PCs - How to Power Reset your Laptop for more information.
-
Press and hold the power button for 10 seconds, and then reinsert the battery and reconnect the power cord.
-
Turn on the computer and wait for Windows to open.
-
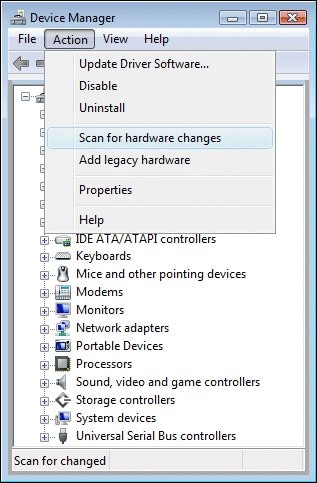
Click Start, type Device Manager in the search field, and select Device Manager from the list provided.
-
If there is no Imaging devices category listed, select Action, then Scan for hardware changes.
-
If Device Manager does not recognize the webcam after the scan, Use Microsoft System Restore to go back to a time when the Webcam was working properly. If problems persist, the webcam might have become unplugged internally and requires service.
Webcam stopped working after a Windows update
A webcam that was working in one of the pre-installed programs suddenly stops working after doing a scheduled Windows Update or after doing a recommended update to YouCam or Media Smart.
To resolve this issue, reinstall the original HP Webcam-101 or Microsoft USB Video Device driver.
-
Click Start, type Device Manager in the search field, and select Device Manager from the list.
-
Double-click Imaging Devices to expand the list of webcam drivers.
-
If the HP Webcam-101 or Microsoft USB Video Device is listed, right-click the driver and select Update Driver Software and follow the on-screen instructions.
-
Restart your computer, open your webcam software and try viewing again. If the problem persists, use Microsoft System Restore to go back to a time when the webcam was working properly.
Installed other webcam programs and webcam does not work
Installation of multiple webcam drivers and programs might cause conflicts. If you are using more than one software program to use your webcam, such as Skype for instant messaging and YouCam for saving videos, then make sure only one program is open when using the webcam. Do not attempt to open both programs at the same time and close your webcam software when you are done. It is a good idea to wait 5 to 10 seconds after closing webcam software, before opening another webcam software program.
Simply restarting the computer can resolve most software conflicts. If problems persist, uninstall one of the webcam software titles and reinstall the software you want to use.
Webcam image quality problems
The webcam works, but the image is not bright or the video is choppy.
The first thing to do is make sure your video recording environment has good lighting. Next, adjust the image quality using the adjustments available from the webcam software. Most webcam software allows you to adjust quality settings for contrast, colors and brightness. To resolve problems with choppy playback, reduce the size of the video image from the software settings, use a high speed Internet connection (for Instant messaging), and do not use other high speed USB devices at the same time you are using the webcam.
Reinstalling the original webcam program that came with your computer in Windows 7
If your computer came with a built-in webcam, HP provides software that you can use with your webcam. If this software program was removed, you can reinstall it using HP Recovery Manager as follows:
note:If the operating system on your computer was upgraded, these steps do not work. Instead, you need to download and install webcam software from HP or the Internet.
-
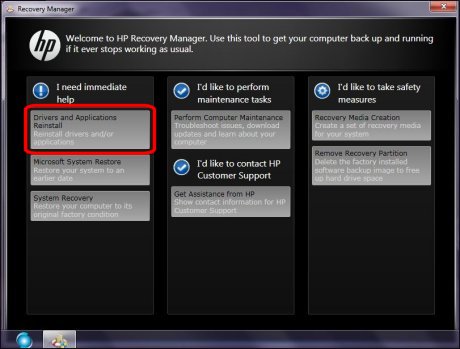
Click Start, type Recovery in the search field, and select Recovery Manager from the search results list.
-
Select Drivers and Applications Reinstall.
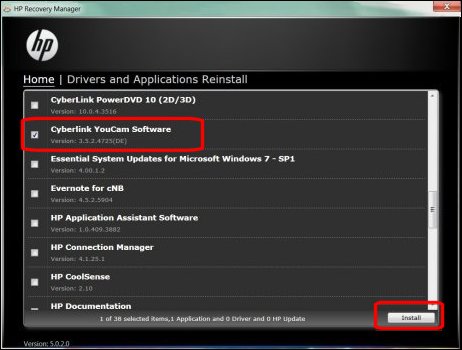
-
Select the appropriate Software program (such as Cyberlink YouCam or MediaSmart), and select Install.
Disabling the webcam in Windows 7
To disable the webcam so that it cannot be used, disable the device in device manager as follows:
-
Click Start, type Device Manager in the search field, and then select Device Manager from the search results list.
-
Double-click Imaging devices.
-
Right-click the name of the webcam and select Disable.

-
Click Yes on the message that warns that the device will stop functioning.
-
To ensure that your webcam has been disabled, open the webcam software, such as YouCam, to see if video still plays. If an error occurs stating that an imaging device could not be found (or similar), you are done. If video still displays in your webcam software, the wrong imaging device was disabled. Repeat these steps to disable your webcam.
note:
To re-enable the webcam, repeat these steps but select Enable instead of disable.
How to Access Webcam on Laptop Windows 7
Source: https://support.hp.com/id-en/document/c02452221